Showing posts with label Basic Pearls Jewel Accents. Show all posts

Wednesday, June 13, 2012

Flowers for the Teacher


     This is the flower bouquet I gave a co-worker whom I've been teaching 6th grade math with for the past 2 school years.  I won't be working with her next year, and I'm going to miss her terribly!  She taught me so much about teaching 6th grade math.  Hopefully next year I can do just 1/2 as well as she has done over the past 2 years.

     I purchased the tutorial to make these flowers from Leigha Rock.  She is AMAZING!  Every tutorial I've purchased has turned out stunning!  Everyone ewwws, ahhhas, and oh mys! over my flowers each time I use one of her tutorials.  I can't thank Leigha enough for her beautiful work, wonderful ideas, and well-written tutorials!  See the other bouquet I made HERE

     Most of the flowers are made using various punches.  The daisies are made using the now retired Stampin' Up! Daisy #2 Big Shot die.  Yes, those are real pencils all the way around the "vase".  Oh, and the "vase", well, that was a bit more challenging than I thought, but not a problem!  I used the middle section of a 20 oz. Pepsi bottle.  I cut the top and bottom off (if you look at a bottle, you'll see a natural place to cut it).  I then pushed that plastic tub into floral foam.  TADAH!  Instant vase!

RECIPE

CARD STOCK:  Lucky Limeade, Pear Pizzazz, Garden Green, Daffodil Delight, & Whisper White

INKS:  Lucky Limeade, Old Olive, Daffodil Delight, & Rose Red

TOOLS:  Paper Trimmer, Daisies #2 Big Shot Die, Floral Fusion Sizzlet, Fun Flowers Die, Ornament Punch, Itty Bitty Shapes Punch Pack, Boho Blossoms Punch, 1-3/8" Circle Punch, 1-3/8" Scallop Circle Punch, Blossom Petals Builder Punch, Basic Peal Jewels - small, medium, and XL sizes, Mat Pack, Paper Piercer, & Stampin' Sponges

NON-STAMPIN' UP! ITEMS:  Floral Wire, Pepsi Bottle, Pencils, Hot Glue Gun, Ribbon, & Floral Foam

Click HERE to order Stampin' Up! products from my website, 24/7

     I also made an apple card to go with this bouquet.  Please stop by tomorrow to see that card!

Happy Wednesday!

Pin It

Sunday, November 6, 2011

     This card was a card I made with my upline, Sally Chuchman.  Her idea is simply gorgeous!


     This is one of those cards you can use for any occasion.  All you need to do is switch up the sentiment.

RECIPE:

CARD STOCK:  Crumb Cake, Very Vanilla, & Basic Black


INKS:  Crumb Cake & Basic Black


STAMPS:  Fabulous Floretes, Fabulous Phrases, En Francais, & Four Frames


TOOLS: Dotted Scallop Ribbon Border Punch, Scallop Edge Border Punch, Decorative Label Punch, Crumb Cake Seam Binding Ribbon, Basic Pearls Jewel Accents, & Dimensionals

Click HERE to order from my website, 24/7

Happy Sunday!
Pin It

Saturday, October 22, 2011

Beautiful card

     I first must give credit to Andrea Walford for this very beautiful card.  I 100% CASEd her card (well, I changed the sentiment).  It's just so gorgeous!  Check it out for yourself:


     This card was so easy to make, despite how difficult it looks.  Just a few colors of Stampin' Pastels, and you have a beautiful card.

RECIPE

CARD STOCK:  Whisper White, Baja Breeze, & Night of Navy


INK:  Versa Mark & Stazon Black  


STAMPS:  Thoughts and Prayers & Thank You Kindly


TOOLS:  Stampin' Pastels, Big Shot, Square Lattice Embossing Folder, Basic Pearls Jewel Accents, & extra-large cotton balls (not SU!)

Click HERE to order Stampin' Up! products from my website, 24/7

     If you would like to learn how to make this card, let me know.  I'd be happy to set up a class to teach you.

Happy Saturday!
Pin It

Monday, June 27, 2011

Elegant Thank You


     I made each of my team members a thank you card for the wonderful birthday celebration they gave me a few weeks ago, and for making me feel so welcome on their team.   This was the first time I've ever celebrated my birthday in school (my birthday is early August - so we aren't in school for my birthday).

     This is one of 7 different cards I made.  This card was so simple and so quick to make (10 minutes tops!), yet it is so very elegant.  It would look great in any color.  I was trying to use up my stash of retired card stock, as it seems like I have a HUGE supply of it.

RECIPE

CARD STOCK:  Whisper White & Pale Plum (retired)


INKS:  Concord Crush & Pale Plum (retired)


STAMPS:  Wedding Sweet


TOOLS:  Basic Pearls Jewels

Click HERE to order Stampin' Up! products from my website, 24/7

Happy Monday!
Pin It

Friday, May 13, 2011

White on White Wedding

CONGRATULATIONS KATE & DAN!


     I wanted to make an elegant wedding card for Kate & Dan.  I had seen a bunch of wonderful white on white ideas on Stampin' Connection (a Stampin' Up! demonstrator-only website).  I love the look of white on white and knew the look would be the perfect look for an elegant wedding card.

     I thought about using a color (green - Kate's favorite color), but I just didn't like it.  I pulled out black and knew in an instant that black was the color to use.

RECIPE

CARD STOCK:  Whisper White & Basic Black

INK:  Basic Black

STAMPS:  Curly Cute

TOOLS:  Big Shot, Elegant Bouquet Embossing Folder, Beautiful Wings Embosslit, Basic Pearls Jewel Accents (NOTE:  I didn't use SU! pearls on this particular card), 2-Way Glue Pen

Click HERE to order Stampin' UP! products from my website 24/7

     I used a little bit of 2-way glue down the center of each butterfly.  When I stuck each butterfly down, I held them down in the middle (where I placed the glue), and pulled the wings up a little bit.  This makes the butterflies 3D and gives them the effect of flying around the card.

     I used a clear envelope (102619) as the finishing touch.

It's always fun to see your card while it's in the envelope, especially when it's a beautiful card!

Happy Friday!
Pin It

Thursday, April 7, 2011

Friend, Stampin' Up! Style

CASEd from Glenda Mollet

     When I saw this exact card design on Glenda Mollet's blog, I knew in a heartbeat I HAD to make it!  Her card is a wedding card AND a uniques design to her - oh how I ♥ LOVE  her card!

FREE MINI TUTORIAL:

     The top layer is Whisper White card stock.  What I did was used Cherry Cobbler ink and a brayer.  I added color to the embossing folder (very lightly, as I found out - don't ask me how), with the brayer, then embossed the paper.  I then used my shimmer mist (rubbing alcohol and Frost White Shimmer Paint in a small spray bottle) and added the glimmer to the paper.  So easy, yet so gorgeous!

RECIPE:

CARD STOCK:  Cherry Cobbler, Whisper White, & Sahara Sand


INK:  Cherry Cobbler & Frost White Shimmer Paint


STAMPS:  With All My Heart


TOOLS:  Big Shot, Elegant Bouquet embossing folder, Brayer, Basic Pearls Jewels Accents, Cherry Cobbler Seam Binding, Decorative Label Punch, Scallop Oval Punch, & Stampin' Dimensionals

Click HERE to order Stampin' Up! products from my website, 24/7

Happy Thursday!

Pin It

Monday, April 4, 2011

Easter Basket

CASEd from Becky Jensen
      This little basket was so easy to make.  It took me all of 15 minutes, from start to finish to make it.  It uses the Two Tags die and the Square Lattice embossing folder.  I love how the embossing folder makes the basket really look like a basket.

RECIPE:

CARD STOCK:  Early Espresso & Whisper White


INK:  Marina Mist, Pretty in Pink, & Early Espresso


STAMPS:  Punch Bunch (2011 SAB) & Forest Friends


TOOLS:  Big Shot, Two Tags die, Square Lattice embossing folder, Scallop Trim border punch,  1-3/4" Scallop Circle Punch, 1-1/4" Circle Punch, Paper Snips, Pretty in Pink Taffeta Ribbon, Stampin' Dimensionals,  Ice Circle Rhinestone Brads, & Basic Pearls Jewel Accents

Click HERE to order Stampin' Up! products from my website, 24/7.

     If you'd like to make one of these really cute baskets, contact me.  If you leave a comment, please be sure to leave your email address, so I can get in touch with you.

Happy Monday!
Pin It

Friday, March 11, 2011

SAB Bliss

     Okay, I was not sold on the Sale-A-Bration Bliss set, UNITL I made this card at our last Dessert Night last month:

Designed by Bonnie Fields

     Once I used the stamp set, I knew I had to get this set.  I love this card!  Thanks Bonnie for designing such a lovely card!

RECIPE:

CARD STOCK:  Concord Crush, Blushing Bride, & Whisper White


INK:  Concord Crush & Blushing Bride


STAMPS:  Bliss (SAB set) & Teeny Tiny Wishes


TOOLS:  Big Shot, Vintage Wallpaper Embossing Folder, Stamping Sponges, Basic Pearls Jewels Accents, Paper Snips, SNAIL Adhesive, & Dimensionals

Click HERE to order any of these Stampin' UP! products 24/7

     This was a very simple card to make.  It only took a few minutes to make.  The hardest part of this card was cutting out the butterfly and flower (not too hard if you ask me).

     You can get this stamp set for FREE!  How?  Just place an order totaling $50 or more (not including tax and shipping), and the set is your for FREE!  Sale-A-Bration will end on March 31, 2011.  Don't miss your chance to get this stamp set, or one of several others (or a Decor Elements, My Digital Studio CD of all SAB items, or many other stamp sets from the 2010-11 Idea Book & Catalog).

     You can place an order HERE or call me with your order.  Who doesn't like FREE Stampin' UP! products?  Don't miss out on your free items.

Happy Friday!
Pin It

Thursday, March 3, 2011

Spotlighting Technique

     Isn't this card gorgeous?


     The technique used on this card is called "The Spotlighting Technique".  I love the look of this technique.

FREE MINI TUTORIAL:

     Cut the paper to the desired size you want spotlighted.  Then place that paper on your card anywhere you what it spotlighted.  Next, stamp on top of the paper and your card.  Layer your smaller paper on a slightly bigger piece of card stock and use adhesive to put on your card.  Next use either the Classic Ink Pads and the blender pens, the Wonder Crayons and the blender pen or Aqua Painter, or the Watercolor Pencils and the Blender Pens or the Aqua Painter to color your design.  Add embellishments to your liking.

RECIPE

CARD STOCK:  Very Vanilla & Basic Black


INK:  Stazon Black, Bashful Blue, Marina Mist, Wild Wasabi, & Garden Green


STAMPS:  Elements of Style


TOOLS:  Blender Pens, Basic Pearl Jewel Accents,  & Marina Mist Satin Ribbon

Click HERE to order any of these Stampin' UP! products, 24/7

     This is a very simple technique that gives you a very big WOW.  Give it a try!

Happy Thursday!
Pin It

Monday, February 28, 2011

Marker Club Thank You Card #2

     We are now in month two of marker club.  All the participating ladies are paying a fee each month for 5 months.  At the end, they will have the complete marker set - Many Marvelous Markers AND the In-Color markers.  What a great way to get a pricey item.

     Anyways, along with their set of markers, each month, I like to include a little "Thank You" for each of the ladies for participating.  Here is this month's "Thank You":


RECIPE

CARD STOCK:  Pale Plum, Concord Crush, Whisper White, & Designer Series Paper Pack- In-Colors (Hostess Level 1)

INK:  Whisper White (Craft) & Concord Crush

STAMPS:  Because I Care (Hostess Level 1 set)

TOOLS:  Big Shot, Vintage Wall Paper Embossing Folder, Eyelet Border Punch, 5 Petal Punch, Stamp-a-ma-jig, Basic Rhinestone Jewel Accents, & Glue Dots 


     Along with this card, I'm also including this really cute treat:


RECIPE

CARD STOCK:  Daffodil Delight, Early Espresso, & Whisper White

INK:  Early Espresso

STAMPS:  Things I Love

TOOLS:  Petal Card Double Punch, Paper Trimmer, Tombow Multi-Purpose Liquid Glue, Andes Candies Chocolate (Non-Stampin' UP!)


     Both the card and the candy treat are very quick and easy to make.  They make really nice "Just Because" surprise gifts to anyone.

Click HERE to order any of these Stampin' UP! products online 24/7

Happy Monday!
Pin It

Friday, February 4, 2011

Marker Club Thank You Cards


     Did you know that the Stampin' UP! 2010-11 Idea Book & Catalog is FULL of wonderful ideas?  I CASEd this card straight from that catalog, page 111 to be exact!  I knew when I saw this cute mini thank you card, I wanted to make them for my Marker Club girls.


     The sample in the catalog uses textured card stock to make the envelope.  I didn't have any textured card stock, so I texturized my own card stock.  I used a Texture Plate (Backgrounds 1).  I used the Scallop Envelope Die to make the envelope.


     I measured the inside of the envelope to get the size card that will fit in it perfectly - 2-1/8 x 3-1/8.  I used the Stampin' Write Markers to ink up the stamp.

RECIPE:

CARD STOCK:  Old Olive & Whisper White

MARKERS:  Old Olive, Peach Parfait, Rose Red, So Saffron, & Early Espresso

STAMPS:  Pocket Silhouettes

TOOLS:  Big Shot, Scallop Envelope Bigz Die, Stamp-a-ma-jig, Itty Bitty Shapes Punch Pack, Pearl Basic Jewels, & Tombow Multi-Purpose Adsheive

Click HERE to order any of these Stampin' UP! products

Remember, with every $50 in product you order, you receive a FREE Sale-A-Bration choice.

     These mini cards are super simple and quick to make.  You can't mail cards this small, but they are perfect to go with a gift or gift bag, or as a little something to give someone.

Happy Friday!
Pin It

Saturday, January 29, 2011

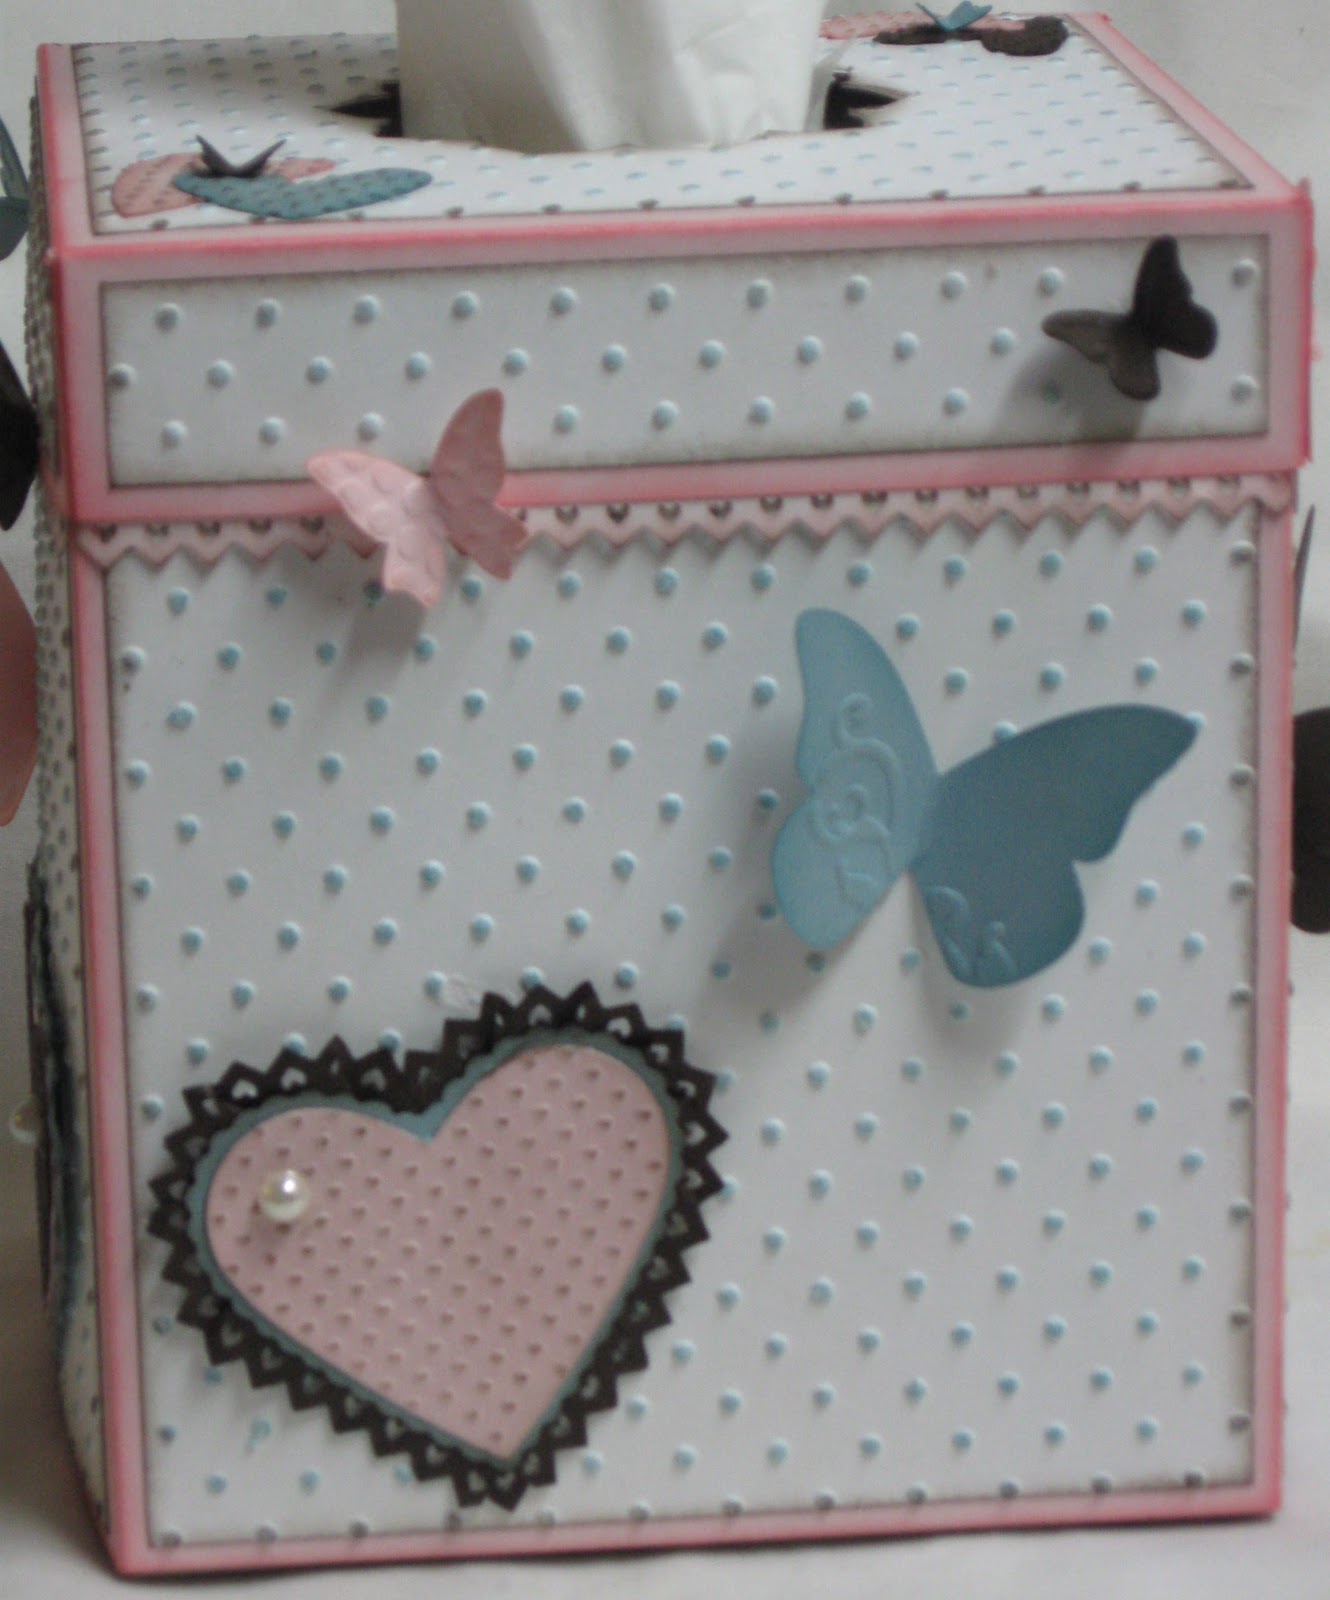
Tissue Box Cover

     So, have you guessed yet what I used the hearts from yesterday's post on?  No, not a card.  No, not a scrapbook page.  No, not a Valentine.  But this:

...a tissue box cover!  What do you think?

     I found the pattern and directions on Splitcoast Stampers.  The minute I saw this project I knew I wanted to make one.   I went to my Color Coach to pick the colors.  I knew I wanted to use Pink Pirouette, but I didn't know what other colors to use.  The Color Coach is the BEST tool  ever!  I came up with Pink Pirouette, Baja Breeze, and Early Espresso.  It is a beautiful color combination!

     The really hard part in making this was deciding how to decorate the box.  I spent about a week trying to decide what to do.  I didn't want it to be "Valentiney" (is that a word?), but I also wanted the frills and "girly" look to it.  During that week, I just started playing with things and the lacy heart was born, see my post HERE for a free tutorial on how I made the hearts.

     Here is a view of the top of the box:

Sorry this picture is blurry  :O(
     I will tell a little secret, that you must promise not to tell.  I used a Nestability to do the opening on the top.  I really struggled with how to do the top and I could only come up with a product not sold by Stampin' UP!

     Here are pictures of each side of my box:


RECIPE:

CARD STOCK:  Pink Pirouette, Baja Breeze, & Early Espresso

INKS:  Pink Pirouette, Baja Breeze, & Early Espresso

TOOLS:  Big Shot, Perfect Polka Dots Embossing Folder, Beautiful Wings Embosslit Die, Scalloped Heart of Hearts Embosslit Die, Pinking Hearts Border Punch, Full Heart Punch, Basic Pearls Jewel Accents, Stamping Sponges, & Tombow Multi-Purpose Adhesive, SNAIL Adhesive, Color Coach, & Crimper

NON-SU! TOOLS:  Spellbinders  Blossom Two Nestabilities (I used the middle sized one of the 5) & Kleenex Tissues

Click HERE if you would like to order any of these products.

     I hope you have enjoyed seeing my tissue box!  If you are interested in making one, contact me.

Happy Saturday!
Pin It

Friday, January 28, 2011

Snow Day Project Sneak Peek

SNEAK PEEK:  Can you guess what I put these on?  I bet you can't!


     If you guessed a Valentine's Day card, you'd be wrong.  You will have to come back tomorrow to see what I did with these beautiful hearts.

     Now on to these beautiful hearts.  Here are close ups of each of them:


     I used the Scalloped Heart of Hearts Embosslit, the Full Heart Punch, and the Pinking Hearts Border punch to make them.  I punched out a Full Heart Punch and then placed it in the middle of the Heart of Hearts embosslit and ran it through the Big Shot.  That is how I got the polka dots on them to match the heart under it.

FREE TUTORIAL:

     To do the lace around the heart, I punched out an 8 in strip using the Pinking Heart border punch.  I then cut it at 3/4" wide.  I then ran it through my crimper 3 - 4 times.  I then took my bone folder and "curled" the strip - on both ends.  What the crimper and curling does is loosen the fibers in the paper and it ends up in two layers that you can pull apart.  This makes the paper very easy to manipulate and work around any shape.  I used SNAIL adhesive on the back of the heart and put the lace on my hearts.  When I had the lace looking the way I wanted it, I punched a Full Heart Punch from scrap paper and used Tombow adhesive to glue it on the back, to hold the lace in place.  I really love the look of the lace on these hearts.

RECIPE:

CARD STOCK:  Pink Pirouette, Baja Breeze, & Early Espresso

INK:  Early Espresso

TOOLS:  Big Shot, Scalloped Heart of Hearts Embosslit, Full Heart Punch, Pinking Heart Border Punch, Crimper, Basic Pearls Jewel Accents, SNAIL Adhesive, Tombow Multi-Purpose Adhesive

     I'd love to teach everyone how to make these beautiful hearts.  If you are interested in learning how to make these, let me know.  I'd be happy to set up a class for those of you who are interested.

Happy Friday!
Pin It

Saturday, September 11, 2010

Elegant Lines & Pearls


     What do you get when you combine these?


Elegant Lines Textured Embossing Folder (119277) $7.95
&
Basic Pearls Jewels Accents (119247) $4.95

     
     You get this!


     I love how elegant this card is.  It was very simple to make, with minimal materials.  I did use a Stampin' Sponge and Regal Rose ink to help make the embossing pop.

RECIPE:

CARD STOCK:  Very Vanilla & Regal Rose

INK:  Regal Rose

STAMPS:  Teeny Tiny Wishes

TOOLS:  Big Shot, Elegant Lines embossing folder, Basic Pearls Jewel Accents, Stampin' Sponge, Scallop Oval punch, Large Oval punch, & Small Oval punch.

Happy Saturday!
Pin It

LinkWithin

Related Posts with Thumbnails

Popular Posts

Labels