Showing posts with label birthday. Show all posts

Saturday, June 23, 2012

Angry Birds - Stampin' Up! Style


     I don't know about your house, but in my house Angry Birds is HUGE!  It's also big with a bunch of my friends.  Who knew that grown adults would love this game as much as kids?

     I received the tag below from a dear demonstrator friend, Bonnie Fields.


     She used the Two Tags Big Shot die, the 1-3/4" Scallop Circle Punch, and a few other various punches to create her Angry Bird.

     Her tag was what got me going on making my card.  I actually CASEd my card from Maria Cameron.  I basically copied her card completely - yet I did have Bonnie's tag in hand to use a reference.  So you can say I used both to create my card.


     This card passed the kid test for authenticity, so I know it's a good one.  I gave this card to a co-worker.  He loved it, as well as all the kids who saw it.  I LOVE when my cards cause people to smile and say, "You made that?"  I live to hear that every time I give a card or project I make.  It's my fuel to keep creating.

RECIPE

CARD STOCK:  Old Olive, Real Red, Whisper White, Pumpkin Pie, Basic Black, & Crumb Cake


INK:  Bashful Blue, Old Olive, & Versa Mark


STAMPS:  Woodgrain background stamp & Happiest Birthday Wishes (retired)


TOOLS:  Whisper White Embossing Powder, Hemp Twine (retired), Dimensionals, & Stamping Sponges

Click HERE to order Stampin' Up! products from my website, 24/7

     I hope you think my Angry Bird looks like the real bird.  I made him twice before I was happy with him, yet I'm still not happy with his tail.  But of course, that is for the next time I make this card.

Happy Saturday!

Pin It

Sunday, March 11, 2012

My Kindle Card

     A friend of mine gave his wife a Kindle for her birthday in January.  The Kindle was not going to be delivered to her in time for her birthday, so I had the brilliant idea of making a card that looked like the Kindle he was giving her, so she would receive a Kindle on her birthday.

      What do you think?


     I used various "Happy Birthday" stamps (both current and retired), and both current and retired card stock.  I also used two different sizes of circle and square punches for the buttons.

Click  HERE to order Stampin' Up! products from my website, 24/7

     This card was a lot of fun to make.  I did some searching to find a picture of the exact Kindle he was giving, so my card would look like the one she was receiving.  The card, and the Kindle, were a hit.  This is the kind of thing I LOVE to do - make a card to look like a product.  Create away!

Happy Sunday!
Pin It

Friday, July 15, 2011

Happy Birthday Card

     The annual Stampin' Up! convention is going on right now in Salt Lake City, Ut.  I'm so bummed to not be there - I've been watching some live feed from demos who are there - and the energy - oh how I wish I could be there.  BUT... I'm in Cape Cod with my family, which is so nice and beautiful - cool (76 degrees as compared to 94 degrees at home), and I'm with my family - a nice break is much appreciated.

     To help lift my spirits about not being at the convention, I've decided to post to my blog, while my husband and boys visit the beach (sounds like fun, but it's cool and windy and I am cold, so I opted to stay home this trip).  I was looking though my camera and found TONS of pictures I have yet to post (I guess I've been busy or something :O)

     I found this *fun* birthday card I made for my husband:


     I saw the candle idea on the demo-only site, Stampin' Connection, by several different demos, so I'm not sure who to give credit to.  The flame is done using the Build a Blossom stamp set - stamping the smallest petal and punching it upside-down.  I inked it using Cherry Cobbler craft ink and heat embossed it using clear embossing powder.  I think this gives it a better illusion of a real  flame.  What do you think?

     Because my husband's age was too much to put that many candles on his card, I got creative and used numbers to indicate his age.  I really like how it turned out.  What do you think?

RECIPE

CARD STOCK:  Whisper White, Basic Black, Cherry Cobbler, & retired holiday DSP


INK:  Cherry Cobbler - classic & craft inks & Pumpkin Pie


STAMPS:  Build a Blossom & Happy Moments (retired)


TOOLS:  Clear Embossing Powder, Heat Tool, Blossom Petals Punch, Ticket Corner Punch, Basic Black Stamin' Write Marker, & Electronic cutting machine (to cut out the numbers)

Click HERE to order Stampin' Up! products from my website, 24/7

     I hope this card puts a smile on your face and improves your disposition like it did for me today!  Tough I wish I was at the convention, I am happy to be with family & friends in a lovely, cool place.

Happy Friday!
Pin It

Thursday, June 23, 2011

Happy Birthday Beer Mug

     Here is another card I made for a team member at work.  This idea came from Heather Summers.  I CASEd her card for this one.  The minute I saw her card, I knew it would be perfect for the person we were giving it to.


     I used Crystal Effects on top of the clear envelope to make it look like the mug is "sweating".

RECIPE

CARD STOCK:  More Mustard, Whisper White, & Close to Cocoa (retired)


INKS:  Close to Cocoa (retired) - both ink pad & marker, Whisper White (Craft), & More Mustard - both ink pad & marker


STAMPS:  Cheers to You (retiring 6/30/11) & Simple Birthday Thanks (retiring 6/30/11)


TOOLS:  Medium Translucent Clear Envelopes, Label Punch (retiring 6/30/11), 1" Circle punch, 1-1/4" Circle Punch, Crystal Effects, Stamping Sponges, & Gold Brads

Click HERE to order Stampin' Up! products from my website 24/7

     Here is the card with the "designer" envelope I embellished to go with the card.


     Tune in tomorrow to see all the cards I made for my teammates this school year.

Happy Thursday!
Pin It

Wednesday, June 22, 2011

Happy Birthday Laptop Card

     This year I was lucky enough to work with a wonderful team of teachers.  This team celebrates everyone's birthday with a card signed by all the team members and cake/cupcakes/brownies - anything good.  Back in February, during a long stretch of snow days, no one could get out to buy a team member a card, so I volunteered to make one (heck I was stuck at home and just looking for a good reason to not have to shovel snow).  Click HERE to see the first team birthday card I made.

     Well, the minute everyone saw that card, they all decided I should make all the team birthday cards, which I eagerly said yes to doing.

     Now, when I make a card for someone I know, I tend to give it a lot of thought and make a card to fit that person.  The card below is no exception to that.


     Yes, this looks like an Apple MacBook laptop computer.  Before you email me and tell me the apple is upside down, it is not.  For those of you who do not have an Apple laptop, the apple is upside down when the lid is closed, so that it's right-side up when the lid is open.  Smart, huh?

     The recipient of this card used to be a teacher in our district's technology department before the district eliminated those positions.


     I made the inside to look like a Word document that says, "Happy Birthday".  Everyone signed on the white part.


     I went to the Apple website and found a laptop keyboard that wasn't black.  Our laptops are all black, but I knew that if I put a black keyboard on this card you wouldn't be able to see it.  You can even see the power button above the keyboard.

     The track pad on this card is the same proportion as the trackpad on our laptops.  I used dimensionals to make the button part of the tack pad raised a little, like the ones on our laptops.


     I also included the camera that is found just above the screen - I couldn't leave that little guy out.

Needless to say this card was a huge hit!  The recipient just loved this card, as I knew he would.  

     I need to thank Lynn Pratt for this wonderful idea and tutorial.  I purchased her "Briefcase & Cards" tutorial in order to make this card.  Only her computer was a Dell, and I needed mine to be an Apple.  I used her idea and just changed what needed to be changed to make mine an Apple.

RECIPE (general)

CARD STOCK:  Basic Black, Whisper White,  Bashful Blue, & Basic Gray

INKS:  Basic Black, Basic Gray, & Real Red

STAMPS:  All Holidays (retiring 6/30/11)

TOOLS:  Paper Trimmer, Paper Snips, Dimensionals, 2-Way Glue Pen, SNAIL Adhesive, 3/16" Corner Rounder, Crop-A-Dile, & Stamp-a-ma-jig

Click HERE to order Stampin' Up! products on my website, 24/7

     I hope this card inspires you to go out and make that card that has been in your head for awhile, or that perfect card that you'd love to make for someone and you don't think it's card material.  If nothing else, this laptop card proves that you can make anything into a card!

Happy Wednesday!
Pin It

Friday, June 10, 2011

Osi, the Bearded Dragon

     What is a Bearded Dragon you ask?  Well, take a look:

A Bearded Dragon is a lizard.

     Osi belongs to Jaime, a teacher I work with.  Her birthday was this past Wednesday.  At school, I've been elected to make all the cards for everyone's birthday (just everyone on our team, which is 10 of us). So when Jaime's birthday came up, I knew I HAD to put Osi on her card.

     Here is my version of Osi:


     Heather Summer's is the most talented lady.  She is the one who came up with the lizard punch art I used to make Osi.  Thank you Heather for this GREAT punch art that I was able to use to make this wonderful card!  What do you think?

I used a few non-SU! items on this card, so I will not give out the recipe this time.  
Click HERE to order Stampin' UP! products from my website, 24/7

     This card was a HUGE hit with the team and Jaime.  I'm really enjoying making everyone's birthday card for the team to sign.  I like to make each card fit the recipient.  So far they have all been a hit.  I have three more cards I will be making this year.  Be sure to stop back next week to see them, (I don't want to post them until the recipients receive them).

Happy Friday!
Pin It

Thursday, April 28, 2011

Awning Card

     Are you looking for a quick and easy WOW card?  How about this one?

CASEd from Dawn Oichefske
     I found a similar card on Dawn's blog.  It's so cute!  I finally found the perfect reason to make one: a co-worker's birthday.

     This card is super simple to make.  You cute a few pieces of paper, use the Scallop Border punch, and the Word Window punch, and voila, a really cute awning card!

RECIPE

CARD STOCK:  Whisper White & Regal Rose


INK:  Early Espresso & Watercolor Pencils


STAMPS: Birthday Bakery (hostess set) & The More the Merrier (retired)


TOOLS:  Scalloped Border Punch, Word Window Punch, Blender Pen, SNAIL Adhesive, Sticky Strip, 2-Way Glue Pen, &  Dazzling Diamonds

Click HERE to order Stampin' UP! products from my website, 24/7

Happy Thursday!
Pin It

Thursday, March 24, 2011

My Punched Bulldog


     I CASEd two very creative Stampin' Up! demonstrators in order to create this bulldog.  I am creative, but not talented enough to think this up on my own.  I need to give a HUGE thank you to Amanda Coughlin and Heather Summers.  I used Amanda's bulldog head (yet did not make him look as mean as she did) and Heather's wiener dog's body.  I'm sure there are other ways to make the body of a bulldog, but I just couldn't create one on my own.  I tried and tried.  Thank you Heather for your idea!

  Since's Heather's wiener dog was part of a paid class, I will not be sharing the recipe on how to make it, but it's not that challenging, I'm sure you can figure it out.

     Here is a picture of the card I put him on:


     I made this card for a co-worker's birthday this week.  Our school mascot is the bulldog, and she has the cutest bulldog, which she shares with the school.  We have her picture on all kinds of things at school.  The kids just love her.

     A bunch of things on this card are not Stampin' UP!, so I won't be sharing all the details.  I hope that you understand why I can't.  

Click HERE to purchase Stampin' Up! products on my website, 24/7

Happy Thursday!
Pin It

Monday, March 7, 2011

Happy Birthday (to Mom)!


     In honor of my mom's birthday, I've decided to post this birthday card.  This is not her birthday card (that one will be reviled after she opens it).  I CASEd it from Mary Brown.  I switched up the colors a little bit, but it's her design.  Though I really like the design, I'm not 100% happy with this card.

RECIPE:

CARD STOCK:  Pretty In Pink,  Rose Red, Baja Breeze,  Whisper White, & Red Glimmer Paper


INK:  Pretty In Pink, Baja Breeze,  & Rose Red


STAMPS:  Create A Cupcake


TOOLS:  Big Shot, Perfect Polka Dot Embossing Folder, Two-Tags Die,  3/8" Whisper White Taffeta Ribbon, Build A Cupcake Punch, 1-3/4" Scallop Circle Punch, Ticket Corner Punch

Click HERE to purchase these or any Stampin' UP! products 24/7

     Happy Birthday Mom!

Happy Monday!
Pin It

Friday, February 25, 2011

Beautiful Birthday

      I'm so sorry it's been so long since I've posted.  Between not feeling great, my mom moving here from Mississippi (and helping her unpack), class, dessert night, and a really sick child, I've had little time to stamp and blog.

     But, since you all have been so patient and loyal to visiting my blog, I thought I'd share a beautiful birthday card I made this week, for a co-worker.  I CASEd the idea from Tami White.  She has the most beautiful and cutest ideas out there.


     I used retired card stock - still working on using up my stash.  What about you?  Are you using up your stash?  Hopefully my cards and projects using retired paper are encouraging you to use up your stash.

RECIPE

CARD STOCK:  Mellow Moss (retired), Pale Plum (retired), Whisper White, & Always Artichoke


INK:  Pale Plum (retired) & Perfect Plum


STAMPS:  Create a Cupcake & Eastern Blooms


TOOLS:  Big Shot, Vintage Wallpaper Embossing folder, Framed Tulips Embossing Folder, Brayer, Build-A-Brad, 1/2" Circle Punch, Blossoms Petal Punch, Mellow Moss ribbon (retired), Glue Dots, & Bone Folder.

Click HERE to order any of these Stampin' UP! products online, 24/7

FREE MINI TUTORIAL

     To make the flower, I cut two pieces of paper - 4-1/4" x 5-1/2".  I embossed both pieces with the Vintage Wallpaper Embossing Folder.  I took my brayer, and using the same color ink as card stock, I inked up my brayer and lightly brayers over the embossed image.  I then punched out 8 large flower petal from the Blossoms Petal Punch.  I then glued four petals to my card (is the shape of a plus sign).  I then took my bone folder and lightly and gently curled the remaining four petals.  I used glue dots and both ends of the four petals, and placed them on my card, staggering them from the first four petals.  I then inked up the largest flower in the Eastern Blooms stamp set, using the same color ink as the color card stock of the flower petals.  I took my 1/2" circle punch and punched out the center of the flower and used that in my Build-A-Brad.  I then "broke" off the prongs of the brad and used a glue dot (actually a few glue dots) to stick it to the center of my card.  I used Always Artichoke and punched the rounded petal/leave out.  I used the fatter end out, as my leaves.

     I made another flower in Concord Crush, yet I haven't had time to make a card yet.  Hopefully this weekend I have a little time to finish that card and post it.  Stop back to see it!

Happy Friday!
Pin It

Thursday, February 3, 2011

Whoo's Birthday?

     A co-worker's, that's whoo's!

WARNING:  This card is not 100% Stampin' UP!


     This card is going to a Science teacher from the whole team.  Since I had snow days the last two school days, and I was sick, I had time to churn this idea in my head.  I knew I wanted to use the Owl Punch, but I didn't know how.  So I turned to Stampin' Connection, a demo only website, for some ideas.  I need to thank Danielle Vincent.  It was her birthday card that I CASEd on the inside.  Wait until you see it!

Too cute!

     I made one owl for each team member.  The one on the front cover is the for the birthday person.  It did take some time to punch all the owls, their middles, and eyes, but it was well worth the time and effort.

RECIPE

CARD STOCK:  Whisper White, Real Red & All retired ~ Yo-Yo Yellow & Brilliant Blue

INK:  Real Read & Pacific Point

STAMPS:  Curly Cute & Beary Best Friends

TOOLS:  Two-Step Owl Punch, 1-3/4" Circle Punch, Ticket Corner Punch, & Dimensionals

NON-STAMPIN' UP! ITEMS:  Cricut Machine and various cartridges & Zyron Machine

Click HERE to order Stampin' UP! products.

Don't forget what with every $50 in products you order, you earn a FREE Sale-A-Bration choice.

     I hope this gives you another wonderful idea for the Owl Punch.

Happy Thursday!
Pin It

Friday, December 3, 2010

For those December birthdays

     Those of you with friends and family who celebrate a birthday in December know exactly what I'm getting at.  December birthdays are tough to not mix with Christmas.  My sister-in-law has a December birthday.  Over the years, I have made it a point to not mix the two, which sometimes can be a challenge.  But this year was not a problem for me.


     I knew the minute I saw this technique I had to try it.  It's not hard at all.  I first made a mask for my stamp, as the stamp I chose is bigger than the oval in the middle of my card.

FREE TUTORIAL:

     Let me back track for a moment so you can follow me better:

     I bought a wooden frame (5x7) at a local craft store in the wood section.  I then stamped my image on computer paper, then put the wooden frame over my stamped image and traced the oval.  I then cut out the oval.  I used Mono-adhesive and attached my mask to my card front and stamped my image (this was to ensure that my stamped imaged stayed within the oval).

     I then ran the card through the Big Shot in an embossing folder.  I put the embossing folder on Tab 1 (no bottom plate), then I placed the wooden frame on top of my embossing folder, ensuring that the oval was positioned correctly over my stamped image (not hard since you can see through the embossing folders), then placed a plate on top and ran it through.  Volia!  Beautiful embossing with the center blank.

     I then used Blender Pens and "watercolored" the flowers.  I'm really happy with the way this card turned out.  The hardest part of making the card was coloring the flowers.

RECIPE:

CARD STOCK:  Very Vanilla & Blushing Bride

INK:  Crumb Cake, Blushing Bride, Bashful Blue, & Always Artichoke

STAMPS:  Elements of Style & a retired birthday set

TOOLS:   Big Shot, Perfect Polka Dots Embossing Folder, wooden frame (non-Stampin' UP!), Designer Label Punch, 1-3/8" Circle Punch, Stampin' Sponge, & Dimensionals

     Don't let Christmas creep into those December birthdays.  Make the birthday person feel extra special by focusing on their birthday separate from Christmas by making an extra special birthday card.  If you need ideas, please let me know.  I'd be happy to show a ton of birthday ideas.

Happy Friday!
Pin It

Tuesday, August 3, 2010

Happy Birthday to me!


     Well, another year has flown by.  It's amazing how when you are young it seems like an eternity between your birthdays, and as you age, it seems like minutes between your birthdays!  Anyways, I LOVE my birthday.  I never have focused on my age, but more on the wonderful experiences I've had and plan to have.

    I received this wonderful email message and I just love it.  I think I'll use it inside my birthday cards:


Sending wishes of good cheer
as you celebrate a special day
May your dreams all come true
and good things come your way


     I have received a bunch of handmade birthday cards.  I plan to take a group picture and post it in a day or two.


     Thank you everyone for your well wishes, your friendship, and your business!

NOTE:  The two photos attached to this post were done using My Digital Studio.  Look how quick &  easy it is to put something beautiful together.

Happy Tuesday!
Pin It

Thursday, June 10, 2010

A Special Birthday Flower Card

     A few months ago, I made this card:

     I attended my upline's card club and this was one of the cards everyone made.  I loved it so much that I immediately bought the stamp set (With All My Heart), from the Occasions Mini Catalog.  I'm hoping it is in the new catalog coming out on July 1st.  I LOVE this stamp set.  This card was super simple and quick to make.  I also used the Extra Large Fancy Flower punch (still available and will be available in the new catalog) to punch out the flower.

     Did you find the fun technique I used on it?  Faux Suede  I used it on the stem of the flower.  Go to THIS post to see how to do the Faux Suede technique.

     I used this card as my inspiration for this next card:
Thanks Sally for designing the previous card which gave me the inspiration for this birthday card!

     I used the same Faux Suede technique on the stem of this flower.  I just love the look, don't you?  Now for this flower, I used the Extra Large Fancy Flower punch and punched out 5 flowers.  Check out THIS post to see how I made the flower.  I bought some cheap body spray in a flower scent, and before I attached the flower to my card, I sprayed it with the body spray.  This gave the flower a very light and lovely scent.  Again, another quick and simple card to make.  Due to the 3-D flower, this card really can't be mailed.  But then, when you make a card like this, don't you like to see the face of the person you are giving it to when they open the card?  I do.  It's worth all the time I put into making the card.

     My open house is this Saturday from 9am to 12pm.  I hope you are able to stop by.  I will be selling older retried stamps, have a few door prizes, special surprises for those that come, and those that place orders on Saturday, free make-n-takes with retiring items and sneak peek items.  Let me know if you are planning on coming.  This way I have enough projects and surprises for everyone.

Happy Thursday!
Pin It

Friday, October 9, 2009

Blue & Orange Birthday

     Happy Birthday!

What?  It's NOT your birthday?  Okay!  How about Happy Un-birthday?


This card is a very happy & fun birthday card.  The blue border around the presents is popped up and the ribbon (retired-sorry!) is tied around the blue boarder.

I can't take credit for this card.  My upline, Sally Chuchman made this card for one of her card clubs about a year or so ago.  I just took her idea and did my thing (CaSEd it).  Thank you Sally for the idea!  I really like this card.

Recipe:

CARD STOCK:
100721 Brilliant Blue
102837 Only Orange

INK:
~Stamp Pads
102696 Only Orange
100691 Brilliant Blue
102122 Green Galore
101731 Whisper White (Craft Ink)

STAMPS:
109294 Sanded
114916 All Holidays
115235 Happy Everything (inside)

TOOLS & ACCESSORIES:
104403 1 1/4" circle punch
104152 Paper Cutter
104332 SNAIL Adhesive
104430 Stampin' Dimensionals

OTHER:
**presents stamps and ribbon are retired**

Happy Friday!

Pin It

Sunday, September 27, 2009

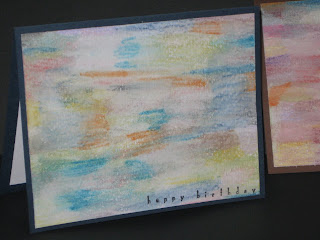
Monet Birthday Card

Well, it's been a few weeks!  Sorry about that.  A full-time job, well two, if you count being mommy, has kept me VERY busy!

I made my sister a birthday card.  She has yet to get it because it's still sitting on my desk, and her birthday was the 23rd.  She is not one who loves the cute and cuddly, the frilly, the girly, or the ultra crafty card.  She does love the arts, so I tried to make her a Monet card.
FREE TUTORIAL:

What I did was use my Stampin' UP! Watercolor Wonder crayons and colored all over watercolor paper.  I then took my Stampin' UP! Aqua Painter and dragged it left to right and right to left to blend and drag the colors across the paper--giving it a Monet painting look.  I love the look it created.  I then stamped "Happy Birthday" in the bottom right corner, using a set from the "All Holidays" stamp set.

Here's the one I'm sending to my sister.

RECIPE:

Ink:
~Watercolor Wonder Crayons:
 106695 Bold Brights
 106696 Earth Elements
 106698 Rich Regals
 106697 Soft Subtles
 106749 Neutrals

~101406 Jet Black StazOn Ink

Paper:
105019 Watercolor paper
101722 Not Quite Navy 8 1/2 x 11 Card stock

Stamps:
114916 All Holidays

Tools:
103954 Aqua Painter

I will be placing an order very soon.  Let me know if you would like to order anything.

Happy Sunday!
Pin It

Sunday, August 30, 2009

It's School Time!

     Yes, it's that time of year again!  I went back to work this week.  My oldest started Kindergarten on Wednesday and my students came back to school on Thursday.  It's been a tough, stressful, tiring, and emotional week for me.  No crafting took place this week.


    I made this card for my best friend's daughter.  She turned 4 this past week.  She LOVES High School Musical.  I decided to make her a card instead of buying one.  I cut out the letter on my Cricut, using Lyrical Letters.  I used glitter glue to make the sparklies on the letters.  I then used a few High School Musical stickers I had to dress up the front of the card.


    Here are two pictures of the inside of the card. You will notice that this card is a bookmark card (a nice added gift to the gift).  I found the directions on how to make this card HERE.  It's super easy, and quick to do.

On the bookmark, I cut the same letters, just smaller, and used the Stickles and stickers to jazz it up.  I used white as the background piece and inked the edges in pink.  I used pretty white ribbon (from a big box store) for the top of the bookmark.  I did stamp a sentiment inside the card and signed it.  I also explained how all the received needed to do was rip out the bookmark.  She loved it!

Happy Sunday to you!
Pin It

Thursday, August 13, 2009

I'm Back!

Hi Everyone!
We are back from a great visit with both families. We did so much: the Erie Zoo, The Children's Museum, running from ducks at Edinboro University, sitting on my dad's sailboat and feeding the fish at Pymatuning Lake, rode the Incline and played in the fountain in Station Square, Science Museum in Pittsburgh, and ate lunch at the Horseshoe Curve in Altoona, PA on the way home. It was an extremely full week, and the boys LOVED it!
I told you I would share with you all the beautiful hand-made birthday cards I received. Well take a look, they are all beautiful! Thank you to JoAnn, Sally, Nancy, Lisa, Mary, Fern (my mom), and Saundra for the beautiful birthday cards. I love them all.

If you have any questions about any of these cards, feel free to leave a comment (with your e-mail address) and I'll get back to you.
Have a glorious Thursday!

Pin It

LinkWithin

Related Posts with Thumbnails

Popular Posts

Labels