Showing posts with label Beautiful Wings Embosslit. Show all posts

Sunday, June 5, 2011

Thanks So Much! #3

     Preschool Thank you card #3;


     This is another card that came about because of something sitting on my desk.  The Very Vanilla piece that is embossed was something I had done for another project that I didn't end up using.  I will share a mini tutorial on how to color in your dry embossed image.

MINI TUTORIAL:

     Start off by dry embossing your card stock, (here I used the Elegant Bouquet Embossing Folder).  Next you will need Blender Pens and Classic Ink Pads in your colors of choice.  While the ink pad is still closed, squeeze the lid of the ink pad against the ink pad itself.  This will put ink on the inside of the lid.  Using a Blender Pen, pick up the ink from the lid and color in the raised parts of your embossing.  Don't color like you are using a colored pencil or crayon.  Color lightly.  If you want it darker, do the color in layers, allowing the layers to dry in between each layer.

     I hope you give this technique a try.  As you can see, it gives you a beautiful look.

RECIPE

CARD STOCK:  Crumb Cake, Very Vanilla, Cherry Cobbler, Daffodil Delight, & Melon Mambo


INK:  Certainly Celery, Bashful Blue, Pretty In Pink, & Early Espresso


STAMPS:  Swirls & Curls Verses


TOOLS:  Big Shot, Elegant Bouquet Embossing Folder, Beautiful Wings Embosslit, Blender Pens, & 2-Way Glue Pen

Click HERE to order Stampin' UP! products on my website, 24/7

     Would you like to have a stash of thank you cards on hand?  Why not plan a private card party where you and your friends can make thank you cards, like the one above?  Contact me today to book your party.

Happy Sunday!
Pin It

Thursday, June 2, 2011

Thanks so much!


     My youngest "graduated" from preschool last week.  He had amazing teachers and extended card teachers this year.  We got them some lovely flowers for their gardens.  Along with the beautiful flowers, I made each of them a different card.

     This is card #1 - I just started to experiment and this is what I got.  I really like how this card turned out!

RECIPE

CARD STOCK:  Daffodil Delight & Cherry Cobbler


INK:  Early Espresso


STAMPS:  Swirls & Curls Verses


TOOLS:  Big Shot, Framed Tulips Embossing Folder, Beautiful Wings Embosslit, Stamping Sponges, & 2-Way Glue Pen

Click HERE to order Stampin' UP! products on my website, 24/7

     Stop back tomorrow to see Thank You card #2.  It's another one of my favorites.

Happy Friday!
Pin It

Friday, May 13, 2011

White on White Wedding

CONGRATULATIONS KATE & DAN!


     I wanted to make an elegant wedding card for Kate & Dan.  I had seen a bunch of wonderful white on white ideas on Stampin' Connection (a Stampin' Up! demonstrator-only website).  I love the look of white on white and knew the look would be the perfect look for an elegant wedding card.

     I thought about using a color (green - Kate's favorite color), but I just didn't like it.  I pulled out black and knew in an instant that black was the color to use.

RECIPE

CARD STOCK:  Whisper White & Basic Black

INK:  Basic Black

STAMPS:  Curly Cute

TOOLS:  Big Shot, Elegant Bouquet Embossing Folder, Beautiful Wings Embosslit, Basic Pearls Jewel Accents (NOTE:  I didn't use SU! pearls on this particular card), 2-Way Glue Pen

Click HERE to order Stampin' UP! products from my website 24/7

     I used a little bit of 2-way glue down the center of each butterfly.  When I stuck each butterfly down, I held them down in the middle (where I placed the glue), and pulled the wings up a little bit.  This makes the butterflies 3D and gives them the effect of flying around the card.

     I used a clear envelope (102619) as the finishing touch.

It's always fun to see your card while it's in the envelope, especially when it's a beautiful card!

Happy Friday!
Pin It

Saturday, January 29, 2011

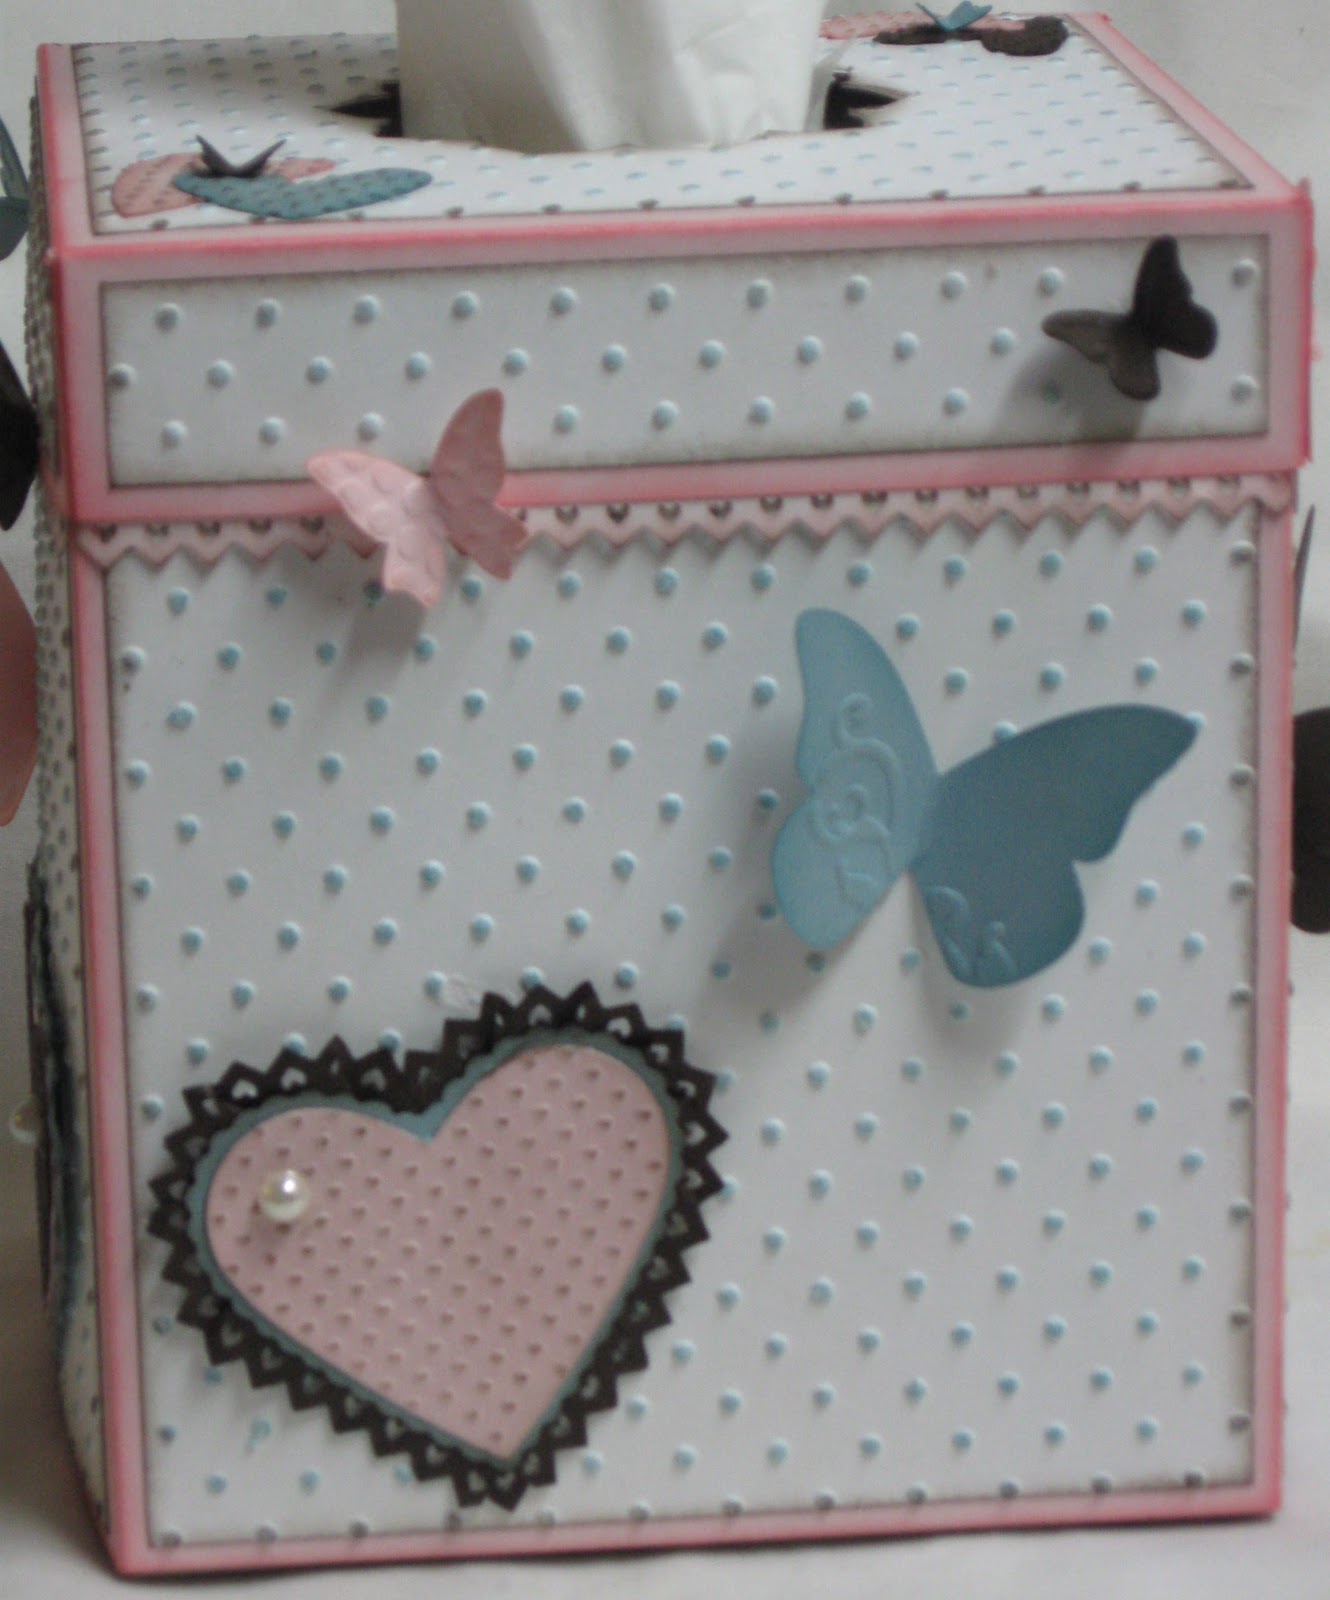
Tissue Box Cover

     So, have you guessed yet what I used the hearts from yesterday's post on?  No, not a card.  No, not a scrapbook page.  No, not a Valentine.  But this:

...a tissue box cover!  What do you think?

     I found the pattern and directions on Splitcoast Stampers.  The minute I saw this project I knew I wanted to make one.   I went to my Color Coach to pick the colors.  I knew I wanted to use Pink Pirouette, but I didn't know what other colors to use.  The Color Coach is the BEST tool  ever!  I came up with Pink Pirouette, Baja Breeze, and Early Espresso.  It is a beautiful color combination!

     The really hard part in making this was deciding how to decorate the box.  I spent about a week trying to decide what to do.  I didn't want it to be "Valentiney" (is that a word?), but I also wanted the frills and "girly" look to it.  During that week, I just started playing with things and the lacy heart was born, see my post HERE for a free tutorial on how I made the hearts.

     Here is a view of the top of the box:

Sorry this picture is blurry  :O(
     I will tell a little secret, that you must promise not to tell.  I used a Nestability to do the opening on the top.  I really struggled with how to do the top and I could only come up with a product not sold by Stampin' UP!

     Here are pictures of each side of my box:


RECIPE:

CARD STOCK:  Pink Pirouette, Baja Breeze, & Early Espresso

INKS:  Pink Pirouette, Baja Breeze, & Early Espresso

TOOLS:  Big Shot, Perfect Polka Dots Embossing Folder, Beautiful Wings Embosslit Die, Scalloped Heart of Hearts Embosslit Die, Pinking Hearts Border Punch, Full Heart Punch, Basic Pearls Jewel Accents, Stamping Sponges, & Tombow Multi-Purpose Adhesive, SNAIL Adhesive, Color Coach, & Crimper

NON-SU! TOOLS:  Spellbinders  Blossom Two Nestabilities (I used the middle sized one of the 5) & Kleenex Tissues

Click HERE if you would like to order any of these products.

     I hope you have enjoyed seeing my tissue box!  If you are interested in making one, contact me.

Happy Saturday!
Pin It

Wednesday, July 14, 2010

Stampin' UP!'s Beautiful Wings Embosslit tip

     As you know, the Beautiful Wings embosslit from Stampin' UP! is my absolute favorite!  Many of you have also purchased this embosslit.  Stampin' UP! has sent out a tip, that I want to pass on to all of you, on the best way to use it, so it doesn't break.


Protecting Your Beautiful Wings Die


July 9, 2010
When you use the Beautiful Wings Embosslits Die, be sure to run the die through the Big Shot so that the hinge is opposite the Big Shot handle. This will help protect the hinge. Also, make sure that you and your customers are using tab 1 when you use the multipurpose platform. Don't forget to share this information with your customers to prevent their dies from breaking.

     I hope this helps prevent breakage of this embosslit.

Happy Wednesday!
Pin It

Monday, February 15, 2010

Kind Elegant Butterfly

     I have a workshop coming up at the end of the month.  I CASEd this card from Barbara Koscienlny, off of Stampin' Connection-a networking site for demonstrators (an added bonus to being a demonstrator).  This is one of the cards the ladies will be making.

  
     I really love the Elegant Bouquet embossing folder and the Beautiful Wings embosslit.  I've been using them almost exclusively lately.

RECIPE:

CARD STOCK: Kraft, Very Vanilla, & Regal Rose
INK: Regal Rose
STAMPS: Whimsical Words (SAB 2010)
TOOLS: Big Shot, Elegant Bouquet Embossing Folder, Beautiful Wings Embosslit, Scallop Oval Punch, Large Oval Punch, Stampin' Sponges, SNAIL Adhesive

Happy Monday!
Pin It

Wednesday, February 10, 2010

Vintage Butterfly Thank You

     This card was 100% CASEd/inspired by Kelly Acheson.  Check it out on her blog, A Stamp Above.  She did this card for her make-n-takes.  The minute I saw this card, I HAD to make one.  Thank you Kelly for sharing this beautiful card!

     Here is my version of Kelly's card:


RECIPE:

CARD STOCK:  Whisper White, Bordering Blue, Night of Navy, & Basic Black
INK: Bordering Blue & Night of Navy
STAMPS: Vintage Vogue & For All You Do
TOOLS: Big Shot, Beautiful Wings Embosslit, Scallop Trim Border Punch (2010 SAB), Stampin' Sponges, Stamp-a-ma-jig, & Glue Dots

Happy Wednesday!
Pin It

Saturday, February 6, 2010

Butterfly Card

     I'm loving the butterflies, and with the butterfly challenge going on, I'm using it as an excuse to play with everything butterflies.
     With all the snow we got over the last 24 hours, a little spring was needed.  This is what I came up with:


     I've done this one for a demo swap I'm participating in this month.  I just bought this embossing folder and when I saw it, I knew it needed butterflies.

RECIPE:

Card Stock:  Certainly Celery, Whisper White, Mambo Melon, Regal Rose, Rose Red, & Pretty In Pink
Ink:  Certainly Celery, Mambo Melon, Regal Rose, Rose Red, & Pretty In Pink
Marker:  Regal Rose
Stampin' Pastels:  Certainly Celery, Regal Rose, & Almost Amethyst, & Elegant Eggplant
Stamps:  Whimsical Words
Tools:  Big Shot, Beautiful Wings Embosslit, Elegant Bouquet Embossing Folder, & Stampin' Sponges

     Here are two of the six swap card I made:


Happy Saturday!

Pin It

Tuesday, February 2, 2010

Butterfly Challenge

     SU! Late Night Stampers Challenge #56--Butterflies.  How could I pass up this challenge?  Well, I couldn't!  I really LOVE butterflies and after a few days thought, I knew exactly what I wanted to make to enter this challenge:

NOTE:  My box has Hershey's Kisses ONLY because I don't currently have any Hershey's Nuggets.  I plan to get Nuggets, and wrap them in SU! paper (to match) and put them in the box.

RECIPE:

CARD STOCK: Pretty In Pink, Regal Rose, Melon Mambo, & Rose Red
INK:  Pretty In Pink, Regal Rose, & Rose Red
SIZZIX DIES: SU! Match Box, SU! Beautiful Wings Embosslit
PUNCH:  5 Petal
TOOLS:  Clear Rhinestone Brad, Glue Dots, SNAIL Adhesive, Stampin' Sponges, Crimper, Bone Folder

     Flower Tutorial Information:  The flower was not my idea.  I CASEd the idea from Juli Buhler.  You can find her tutorial at her BLOG.  Check it out.  It's so easy, and fun to make!

     I hope my project makes you think of spring.  Even though Phil saw his shadow today, and proclaimed 6 more weeks of winter, someone will need to tell that to the robins I saw today.  It's been in the teens for about 1 1/2 weeks now, and it's snowing as I type this, but the robins have decided to migrate to PA in early February.  Maybe they know something that Phil doesn't know?

Happy Tuesday!
Pin It

LinkWithin

Related Posts with Thumbnails

Popular Posts

Labels